wide pink polka dots background

Wednesday, May 18, 2011

Sort Of Tutorial

Ok...so this is gonna be a "sort of" tutorial for putting in a placket.  Way back- a coupla months ago-  when my life was consumed with making THREE Easter outfits (four if you count mine) I had two dresses that called for plackets.  I had put in a placket before on A's Easter dress 2011 but my memory was a little fuzzy about how to make one (aside from the fact that I recalled it being scary and difficult) so I did what I usually do when I don't feel like thinking and figuring out...I Googled... "How to make a placket".  I didn't really find a whole lot out there. I mean, there were some lovely directions on this, but nothing with actual step by step photos. So I gathered up some scrap fabric and reached back into my 2010 Easter dress memory file and (sigh) used up some of my brain cells to figure out this placket thing.  

Can you imagine my surprise when I discovered that putting in a placket was (GASP) easy!!  It was then that I decided I would post a "sort of" tutorial with step by step photos for making a placket...Unfortunately my computer decided that it didn't want me adding pictures or anything else that would take away from it's already limited memory.  So I had to wait...which brings me to my "sort of" placket tutorial.

Step one
Find the center of the skirt back.  Measure the size placket you will be making (mine is 3 inches) and draw a line (using a fabric marker).  Ignore the stitching on the side...I had already done that before I thought about taking pictures :)


Measure 1/4 " on each side of your mark.  Stitch at an angle (V) from the top of the skirt to the bottom of your marker line, pivot and stitch one stitch across, pivot and stitch to the top of the skirt at an angle (you should end up 1/4" from your mark on the opposite side).


Cut along the mark line (NOT on your stitch lines!)


Open your skirt piece up where you cut.  I cut 3" so I now have a total of 6" open. 


Cut a piece of fabric (facing strip) 1 and a half inches wide by the total placket length when it is opened.  Since I made my placket 3" it is 6" when opened. (ie: If your placket is 5" then your facing strip would be 1 & 1/2" x 10").


Pin facing strip to the skirt, right sides together. If you look closely at the pictures you will notice that the edges line up on each end but in the middle (where it V's) the facing strip is slightly showing. 


Stitch just to the outside of the previous stitching.


This is what it will look like when you open it. 


Fold the facing strip over and press.  Then turn 1/4' along the raw edge and press.


Fold facing strip to the wrong side of the skirt just covering the stitching line.  Pin in place.


Stitch right along the facing piece. I use a "stitch in the ditch" foot (Bernina foot 10) but you can use a regular foot and it works fine.


Fold placket to wrong side and press in place.  Stitch 1/4" from top edge just a couple of stitches (don't forget to backstitch) and then diagonally across bottom of facing (where it V's)


That's it!! You have made a beautiful placket.  It was super easy and your dress has a much more finished look.  Remember, if you still aren't exactly sure if you are doing it right you can always use scrap fabric to "practice" on first.

Happy Sewing!!

Wednesday, May 11, 2011

Sew Sweet!!

While checking out the Michael Miller blog ~  I ran across THE MOST ADORABLE FABRIC!!  It isn't available just yet, but rest assured that when it is, my child/children WILL be adorned in it...lots of it!

The designer of this fabric is Sarah Jane, an illustrator that I have admired for some time now.  Her illustrations are so sweet  and reminiscent of my childhood. 


To see her full collection go to Kathy Miller's blog here
or to Sarah Jane's blog here.

Happy Sewing!
~Heather

Monday, May 2, 2011

Update on Summer sewing classes

Hope everyone is OK from the terrible storms that came through last Wednesday.  I was thrilled to death when our power came back on last night and then I was able to get on the computer today, yea!!  I can't say that I didn't not like having the power being out though.  It slowed things way down and honestly, I really liked it.  We got to know our neighbors across the street a little better, we didn't have to run and be here and there, and we went to bed just after dark.  I have to say, I really liked not having power for a little while, but I am glad to have warm bath water again, awwww!!

Anyway, just wanted to update everyone and let you know that we had to change our classes around a little bit.  Some really cute knit that Barb is getting in is not going to be here until June, so we are switching around a couple of the classes to accommodate that.  I have attached the updated flyer and if you are on Barb's mailing list, you should be receiving one in the mail soon.  Sign up soon, before they fill up!!

Wednesday, April 27, 2011

Sandi Henderson Pattern Sale

Hey all!  Something completely unheard of is going on over at Sandi Henderson's Portabellopixie site...she has marked ALL of her patterns 50% off!!  She is changing to a larger distribution center and is getting rid of inventory before the move.  She says that most likely she will not restock these patterns so get them while they last!!  Here is a link to her blog.  You can go to her store from there to order the patterns.
                                          portabellopixie.typepad.com

Happy Sewing!!

Tuesday, April 19, 2011

New exciting classes

I know ya'll are thinking we dropped off the face of the Earth, because there haven't been any posts lately.  Truth is heirloom sewing is not something you can just whip up real fast, it completely takes over your life for a while!!

On to better things... new classes for this summer.  We are scheduled to teach three classes this summer at Barb's Sewing Center.  Very, very excited about all of them. There are some super cute patterns and techniques we'll be teaching.  Take a look at the flyer and see if you are interested in any of them.  If so, run, don't walk, to Barb's to sign up!! 

As you can see, we don't have just a bunch a followers right now, so if you wouldn't mind, please pass the word on, post to your blog, or facebook page.  Thanks bunches!!!

Wednesday, March 16, 2011

Fabric Euphoria


Yesterday I made a trip to one of my favorite fabric stores...Quilter's Combo in Madison.  They just got in a new Michael Miller shipment and Oh My Goodness!!  She had about 10 different fabrics from the Pillow and Maxfield Gypsy line.  I couldn't decide which ones I liked best.  These are the three that I ended up picking out for a flounce skirt for Grace.


Like I said, these are just three of the MANY fabrics from this Michael Miller line.  So, what are you waiting for?  Go check them out!

Tuesday, March 15, 2011

Portabellopixie Gracie workshop

Don't forget to sign up for the round yoke Gracie dress workshop at Barb's Sewing Center.  The class is scheduled for next Tues. (3/22) and Thurs. (3/24) evening from 5:30-8:30.
Sign up and pay for the class at Barb's (located at 2310-A Whitesburg Dr.) or you can call 256-539-2414 and pay at time of class. 
If you do not already have the Portabellopixie Gracie pattern you will need to purchase it along with your supplies. *Remember, Barb offers a 20% discount if you buy your supplies there.  She has the Portabellopixie pattern in stock along with some gorgeous fabric!
Also, be sure and wash, dry, and iron your fabric before the class!

Hope to see everyone next week!


Wednesday, March 2, 2011

Happy Birthday Dr. Seuss!!

Let me begin by saying, "Shonda, you were right."

About what? you ask. I'll get to that...eventually. 
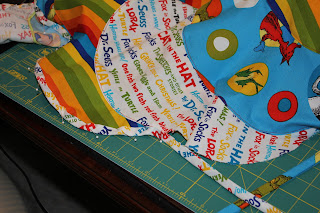
Several weeks ago A couple of months ago one of our local fabric stores, Quilter's Combo, got in a huge selection of Robert Kauffman's Dr. Seuss fabric.  FUN! COLORFUL! SEUSSTABULOUS-yes, I know that's not a real word just go with it! Everytime I went in I made a bee line to it wondering just what I would, could do with it.  I knew eventually I would break down and buy some, but I wanted to be fairly sure that I knew how much I would need.
Finally it hit me~ I had an Izzy and Ivy~Beverly Bell~pattern that I had bought ages ago and had never done anything with.  It was fun and funky. Perfect for that fabric.  I marched down to Quilter's Combo, bought what I needed, and went home to wash, dry, and iron my fabric (which I must say, is very therapeutic). 

Not being a procrastinator...wait what?!?...Oops, BEING a procrastinator I set the fabric to the side and focused on more pressing, upcoming obligations.  In a corner of my sewing/dining room (sigh...yes, we dine with fabric and sewing machines each night) sat this amazing, funky fabric, almost forgotten until I realized that it was February 28, and Dr. Seuss' birthday was less than a week away.
To make a short story long long story short I cut out the very curvy pattern pieces and began pinning them...

then took them apart to repin...again and again and again.  At some point I think I googled this particular pattern to see if there was any other human who had made this pattern and had similar trouble matching the sides up... It was during this process that I expressed to Shonda, my Sewdapop Shop partner, how much I DID NOT ENJOY MAKING THIS OUTFIT!! 
To which she replied, in her infinite wisdom, "When you get done with this you'll be so glad you made it and you will probably want to make another one." hahahahahhahahaha~ I thought.

 It took ALOT of stretching and pinning and restretching and repinning but I finally got the sides to match up and I was on my way... I really wish I had taken pictures in case there is someone out there who has similar problems and googles this pattern like I did.

Anyhow, once I got everything pinned and sewn in place I did decide it wasn't so bad and was actually rather fun (I have always been one to enjoy challenges anyway).  It was after making yards and yards of bias tape- the pattern calls for 8 yards- and I began pinning it on that I thought about taking some pictures.  It is here that I will end my novel and let the pictures tell the rest of the story~ Melissa DO NOT let Dustin see that I was wordier than him on this blog!

Here is the only pattern piece you will need...see the end of the "elf shoe"?  You have to pin the fabric RST with the end matching up to the notch on the other side...sound easy?  It seemed easy until I realized that the side with the notch always seemed to be a little longer...hence came the stretching and repinning.  PINS ARE YOUR FRIENDS!

pinning on the miles of bias tape.  I made mine out of the three different fabrics that I used.  I started out thinking I would take the lazy way out and just serge the bottom~what with time being limited and all~ but I decided since I had already put so much effort into it I should probably give it a more finished look.  I am SOOOO glad I did.  Putting the bias tape on was easy and just makes the shirt gorgeous!!


putting the bias tape into the bodice for the elastic casing.


So, in summary...Shonda, you were right!! =)

Monday, February 28, 2011

It Was SEW Much Fun!

We had our first sewing workshop this weekend and it was a success! Only 5 of the original 11 ladies were able to make it (which was probably a good thing- gathering the tiers took a little getting used to) but we had so much fun!!  Three members of our group were completely new to sewing but two tiers into it they were getting the hang of it...two of them even made another  Gracie skirt!

We chose the Portabellopixie Gracie skirt to teach...partly because that was the one that was requested and partly because it is such an adorable skirt for girls of all ages! (Sandi feel free to reprint this pattern in adult sizes- wink, wink).  Sandi Henderson is the designer of the Portabellopixie patterns and let me just say that she does an outstanding job!  The directions come in a colorful booklet with LOTS of illustrations.  Even a beginner can figure them out (especially with her tutorials in the back of the book).  The price of the pattern may seem a little high ($15.95 retail) BUT they include 4 DIFFERENT patterns in one...not just four variations, but four different designs!  She currently has 4 children's patterns in print - Gracie, Claire, Analise, and Ruffle Pants...2 patterns that include both child's and adult's sizes- The Berry Picker Skirt and The Saturday Skirt...a purse pattern - The Market Bag...and a pincushion pattern! 
You can buy her patterns on her website at    http://sandihenderson.com/  
A HUGE "THANK YOU" to Sandi Henderson!

We have traced the pattern and are ready to cut the fabric...This was a little nerve wracking for the beginning sew-ers.  Fortunately all went well during this first step.


Sewing the side seams together...this was the easy part!


Gathering the tiers was the hardest part...VERY time consuming.  I think everyone will agree that patience is an EXTREMELY important characteristic to have when sewing!! ;p
See how much fun gathering is!

 It was tough trying not to sew over the gathering stitches.


Melissa got so good at it she decided to make a 2nd skirt!


Here are the final results...Great job everyone~ Looks great!!


Melissa still needed to measure Kensley before she could put the elastic in the skirt.  She had a little serger mishap with her 2nd tier, but in the end it all worked out and is probably even cuter because it's a little different from her first skirt.  BTW- problem solving is a necessity when it comes to sewing!


Friday, February 4, 2011

Welcome to the Sewdapop Shop!

Let us begin by introducing ourselves!  We are the Sewdapop Girls...two best friends with a passion for all things creative!


We are constantly being inspired by God's beauty around us and have decided to give back some inspiration.  We have created this blog as a way to share our ideas and creations...plus our husbands are tired of smiling and nodding each time we show off our latest accomplishment :) 


Although we especially enjoy sewing and designing clothes, we have also been known to take the old and discarded and turn it into something new and grand. We hope that you will find our tutorials useful and that your sense of creativity will be awakened!