Let me begin by saying, "Shonda, you were right."
About what? you ask. I'll get to that...eventually.
Several weeks ago A couple of months ago one of our local fabric stores, Quilter's Combo, got in a huge selection of Robert Kauffman's Dr. Seuss fabric. FUN! COLORFUL! SEUSSTABULOUS-yes, I know that's not a real word just go with it! Everytime I went in I made a bee line to it wondering just what I would, could do with it. I knew eventually I would break down and buy some, but I wanted to be fairly sure that I knew how much I would need.
Finally it hit me~ I had an Izzy and Ivy~Beverly Bell~pattern that I had bought ages ago and had never done anything with. It was fun and funky. Perfect for that fabric. I marched down to Quilter's Combo, bought what I needed, and went home to wash, dry, and iron my fabric (which I must say, is very therapeutic).
Not being a procrastinator...wait what?!?...Oops, BEING a procrastinator I set the fabric to the side and focused on more pressing, upcoming obligations. In a corner of my sewing/dining room (sigh...yes, we dine with fabric and sewing machines each night) sat this amazing, funky fabric, almost forgotten until I realized that it was February 28, and Dr. Seuss' birthday was less than a week away.
To make a
short story long long story short I cut out the very curvy pattern pieces and began pinning them...
then took them apart to repin...again and again and again. At some point I think I googled this particular pattern to see if there was any other human who had made this pattern and had similar trouble matching the sides up... It was during this process that I expressed to Shonda, my Sewdapop Shop partner, how much I DID NOT ENJOY MAKING THIS OUTFIT!!
To which she replied, in her infinite wisdom, "When you get done with this you'll be so glad you made it and you will probably want to make another one." hahahahahhahahaha~ I thought.
It took ALOT of stretching and pinning and restretching and repinning but I finally got the sides to match up and I was on my way... I really wish I had taken pictures in case there is someone out there who has similar problems and googles this pattern like I did.
Anyhow, once I got everything pinned and sewn in place I did decide it wasn't so bad and was actually rather fun (I have always been one to enjoy challenges anyway). It was after making yards and yards of bias tape- the pattern calls for 8 yards- and I began pinning it on that I thought about taking some pictures. It is here that I will end my novel and let the pictures tell the rest of the story~ Melissa DO NOT let Dustin see that I was wordier than him on this blog!
 |
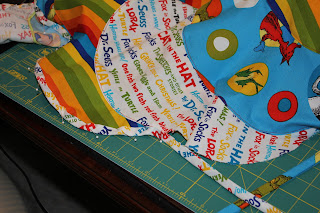
| Here is the only pattern piece you will need...see the end of the "elf shoe"? You have to pin the fabric RST with the end matching up to the notch on the other side...sound easy? It seemed easy until I realized that the side with the notch always seemed to be a little longer...hence came the stretching and repinning. PINS ARE YOUR FRIENDS! |
 |
| pinning on the miles of bias tape. I made mine out of the three different fabrics that I used. I started out thinking I would take the lazy way out and just serge the bottom~what with time being limited and all~ but I decided since I had already put so much effort into it I should probably give it a more finished look. I am SOOOO glad I did. Putting the bias tape on was easy and just makes the shirt gorgeous!! |
 |
| putting the bias tape into the bodice for the elastic casing. |
So, in summary...Shonda, you were right!! =)